Thursday, 29 September 2016

Bake with Me: Fruit Scones...


I was sorting through a pile of old books in my cupboard, when I came across some cookery books from my childhood. I got my love of cooking, as I'm sure many of you did from yours, from my Grandma. We had a bit of a difficult relationship at times, but I loved her and everything she passed down onto me.

We had used this book many, many times and her handwriting still remains on the front, where she noted the page number of "Choc Crispies" - a favourite of ours to make. After spending a few moments fondly reminiscing, I decided I would challenge myself to bake something from the book (my copy published in 1978!) and went with Fruit Scones, as I had all the ingredients in the cupboard.

The recipe is very unlike recipes of today, and I thought it would be fun to see how they turned out - as you can see, not too bad at all!


I will list the recipe exactly as it appears in the book, although I did make a tweak or two along the way! You can read what I did differently at the end. The recipe suggested from the pictures that I would get 6 scones, so I doubled the recipe and I got 16 scones.

Cooking can be a wonderful way to relax the mind and ignite the spirit. Why not take some time this weekend and create a new memory, for your child to have with them to reminisce about one day, when they too are older like me?


Recipe taken from Floury Fingers by Cecilia H. Hind.

Fruit Scones

Ask Mummy to put the oven on at Electric 475 f (250 c) or Gas Regulo 9

You Will Want

  • Flour Self Raising
  • Salt
  • Margarine
  • Milk in a cup
  • Caster Sugar
  • Sultanas
  • Big Basin
  • Rolling Pin
  • Cutter
  • Blunt Knife
  • Pastry Brush
  • Sieve
  • 2 Small Spoons - for measuring
  • Big Spoon - for measuring
  • Cup - for measuring
  • Baking Sheet - Rub it with a bit of margarine paper to make it greasy

See that your hands are clean and your overall on.

Take the basin and the sieve. Put the sieve over the basin.
Now put into it
FLOUR ...... One (1) cup, heaped
SALT ...... One (1) pinch
Shake the sieve until all the flour and salt have fallen into the basin. Take off sieve.


Put into the basin
MARGARINE ...... Two (2) small spoons rounded
Now rub together the flour and fat. Do it with your fingertips until there are no more lumps of fat left in the flour. Then wash your hands.


Put in
CASTER SUGAR ...... Three (3) small spoons
SULTANAS ...... One (1) big spoon
Mix them in with your fingertips. 


Pour in the
MILK ...... Four (4) big spoons
Stir quickly with your blunt knife.

Now you have to hurry or your scones will be spoilt.
Sprinkle flour on the table. Tip out the mixture and pat it to make it round. 
Take your rolling pin. Sprinkle it with flour and roll out the mixture until it is 1.2 cm (1/2 in) thick.
Take your cutter, dip it in the flour, cut out round scones and place them on the baking sheet. Gather up the pieces, quickly make them them into a round and cut out more scones until all the bits are used up.


Dip your pastry brush into the milk and paint the tops of the scones. This will make them shiny brown when they are cooked. Do all these things quickly.


Now ask Mummy to put them into the oven. Leave them there until they are brown, about 8 - 10 minutes.
Tell Mummy when it is time to take them out. When they are cooled a little, split them in half and butter them.


As you can see, a very basic recipe - but it worked! I used a Table Spoon measure for the "big spoon" and a teaspoon measure for the "small spoon". I needed to use 14 "big spoons" to get my mixture to come together. I would suggest starting at 8 (remember I had doubled the recipe) and keep adding until the mixture comes together in a light dough (not too wet and not too dry).

I also used raisins instead of sultanas, as that was what I had on hand.

Unfortunately where we live now, there is no Western style oven and I had to use my table top oven. 200 c. worked best for me in this instance. Again, I would suggest starting at the given temperature and keeping an eye on it, as soon as they start to go brown, take them out. You may need to lower the temperature as I did and turn the tray half way through.

I like the way the recipe asks the child to keep an eye on the time, this is a great way for children new to time telling to learn how to follow the minutes on the clock - however given that this recipe calls for the scones to be checked on regularly, maybe this is not the best recipe for that!

It's funny how all those decades ago, Mummy was obviously the only one who would be baking with the children! I'm glad that today, Daddy's get to cook too!

Do you have any favourite recipes from your childhood? What delicious treats do you like to cook with your kids (or on your own!)? 

Thank you for reading, 'till next time...


Thursday, 22 September 2016

Halloween Room on the Broom Literary and Math Companion

In my previous post I said that I would be going into further detail about my Room on the Broom Literary and Math Companion. So here we go!

Room on the Broom is a wonderful Halloween tale from the brilliant Julia Donaldson. The story of a witch and her cat, who befriend a dog, a bird and a frog before taking on and defeating a ferocious dragon! The story culminates with the witch using a spell to create a truly magnificent broom for them all to soar through the sky on!

This companion is filled with worksheets and activities, it's all you need to further your reading of this timeless tale.


There are 183 pages included in the companion, 89 pages in the Math Companion and 94 pages in the Literary Companion.

You can download a freebie from my TPT store so you can get an idea of what is in the pack. The freebie includes two number bond worksheets (with accompanying answers) and the character traits sheets. You can download it HERE!


So what exactly do you get in this companion?

There are 56 rhyming cards. Simply print, cut and laminate. These are perfect for using as flashcards or playing games such as snap or old maid. I also created 42 vocabulary cards. The first group show just the images and the second group show the image and word. I just LOVE the clip art by EduClips and Lil' Frog Illustrations!


Rhyming plays a large part in the story and I wanted to focus on this, so I created various rhyming worksheets. The first set requires students to fill in the missing rhyming word - you could also provide the rhyming cards to help them with this. The second set involves students joining up the two words that rhyme.

Room on the Broom Rhyming Worksheet

There are further vocabulary cards, these ones with definitions to help with harder words. Again, I like to print, cut and laminate these for durability.

There are five story map pages. Plot and Ending / Problem and Solution / Beginning, Middle and End. I wanted students to have the opportunity to write and draw, so made sure to create different versions.

Venn diagrams are used for compare and contrast. Students have the opportunity to compare and contrast the witch & the dragon and the frog & the bird. A plain Venn diagram has been included so that you can compare and contrast whatever you like!


As my students have quite a wide range of abilities, I offered different options for cause and effect. Students could either fill in both the cause and effect themselves, use a guide and fill in either the cause or the effect, or cut and paste the given sentences into the correct spaces. My kiddos just love to get their scissors and glue out!

When it came to sequencing the story we use both the puzzle pieces and the cut & paste. I print, cut and laminate the coloured larger puzzle for students to complete in groups. The worksheet requires students to cut and paste the puzzle pieces into the correct space, and write out the events in number order. A picture cut and paste sheet allows students to cut the picture and paste in the correct sequence.

Sequencing Halloween Room on the Broom

We also sequence the story by writing the events out in the order they occurred on the worksheet provided. For differentiation, the sequence of events are also provided on a cut and paste sheet.

Students also get to identify the character traits for the witch and the dragon. They can either write in their own traits or use the cut and paste traits provided. They love colouring the pages afterwards!


My kids love their writing prompts! It really gives them the opportunity to let their imaginations run wild! There are two line options included and seven different prompts. Students get to draw their picture and then write their answer. I also created colourful prompt cards to encourage students to consider how they might feel, what they might see & smell, and what they might hear,

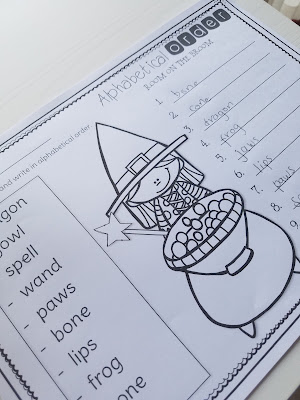
Another way I like my students to focus on the vocabulary, is to provide them with alphabetical order worksheets. There are four included in the pack. I also made bright and colourful alphabet cards that are perfect in a Center, print, cut and laminate. Provide students with the recording sheets to fill in. (You could also print, cut and laminate these and have students use dry wipe markers to fill in.)

I like to finish the day with a word search! There are two different versions here, a 10 x 10 with more advanced vocabulary and an 8 x 8 with easier vocabulary.

With "Match Up" students match the picture to the text using the recording sheet provided. An answer sheet has also been included.

In "What did I lose?" students use the clue and the rhyme to decide which items the witch lost and which frame they need to go in. Another great cut and paste!

I also get students to draw / write what they liked about the story and what their favourite part / character is. A worksheet for this is included.


And there was no way we do a thematic unit without a few games!

My kiddos LOVE to play "I Have, Who Has?", it's one of their favourites! We have two versions, pictures / pictures & words. They always get so excited wondering who will have the next card!

I like to provide a board game that relates to the book we are focusing on. This game has numerous cards that go with it. There are addition and subtraction cards and noun / verb / adjective cards. (There is also a sheet of card fronts for you to use!) Every time a student lands on a picture space, they pick a card! Answer sheets are provided for reference. Two dice are included, a picture die with number key and an regular die. Students follow the instructional page and the first person to the finish space wins!

We also love to retell the story and I find the best way to do this is with retelling props. I like to print, cut, laminate, then adhere them to popsicle sticks. You could also use these images for a sequencing activity! We use them alongside the retelling prompt sticks - a great way to focus students on the task.

Four colourful posters are also included for your room!


There are three Addition worksheets with accompanying spinner and number path / line (these also come in black and white to save on ink). Have students use the spinner to find two numbers, then add them to find the sum. You can attach the arrow with a brad, or simply use a pencil and paper clip! You could even use the spinner with the board game instead of the die!

We also cover size understanding with a colouring-in worksheet. Students read the prompt then colour the correct picture. Another cut and paste is also included, students colour the pictures then cut and paste in correct size order.

Colourful size cards can be printed, cut, laminated and placed in a center. Recording sheets are included with a variety of options for different levels. Students can write the answer or circle the answer.

Number puzzles are a great way to have students practice their numbers in a fun way! There are colour and black & white versions. There are six different puzzles in the pack.

Shape shadows require students to colour the pictures, cut the boxes and paste onto the correct shadow.

The "spot the difference" worksheet has four lines of pictures, students colour the picture on each line that is different!

There are also four "complete the pattern" worksheets. Students cut and paste the correct picture to complete the given pattern.


My students are also crazy for number bonds! I either provide the printed worksheets for them to fill in, or laminate them to be filled in with a dry wipe marker - this extends their use and longevity! There are eight different pages, four with numbers 1 - 10 and four with numbers 1 - 20, all themed to Room on the Broom. Answer sheets are also provided.


And a theme pack wouldn't be complete without a colour by number! There are four colour by number pages and seven colour by sum pages. US versions with the spelling "color" have been added as well!

You can find my discounted Room on the Broom Literary and Math Companion HERE!

If you would prefer to use only the Math Companion, you can get the standalone version HERE and if you would prefer to use only the Literary Companion, you can get the standalone version HERE!

I can't wait to use this pack with my students this year! I love Halloween and in particular Room on the Broom. Do you have a favourite season and story?


Sunday, 18 September 2016

Room on the Broom Board Game

Who doesn't love Julia Donaldson's wonderful Halloween tale Room on the Broom? The story of a friendly witch who along with her cat, befriends a dog, a bird and a frog? 

In preparation for the upcoming Halloween period, I created this fun and colourful board game to be used when reading Room on the Broom. Help the witch get to her cauldron!


Students will love seeing the characters from the story realised in a visual, hands-on way!


There are two options you can choose to use, (or why not use both for an extra challenge?!) Addition and Subtraction or Nouns / Verbs / Adjectives.


The Addition and Subtraction set includes 48 cards and an answer sheet. Each card is numbered for easy reference to the answer sheet. The Nouns / Verbs / Adjectives set includes 36 cards and an answer sheet. Each card is numbered for easy reference to the answer sheet. There are 12 noun cards, 12 verb cards and 12 adjective cards. I have also included a sheet of card fronts. Simply print, cut, join a card front with a question card and laminate!


Also included are different dice options. A normal die and a themed die. The themed die comes with a number key.


A handy instruction page completes the set.


I used colourful buttons as playing pieces, but counters or blocks would also work great!


This can be purchased in my store as a stand alone product or as part of my hugely discounted Room on the Broom Literary and Math Companion!


Each companion is also sold separately, the literary companion includes the Noun / Verb / Adjective cards and the Math Companion includes the Addition and Subtraction cards. For more details on these items, please follow the links below!


For more Halloween products, check out the Halloween section of my store!


I will be going into further detail about my Room on the Broom Literary and Math companion over the next couple of weeks. I guarantee it will engage your students and is all you need for a themed unit on this wonderful book (you will need to purchase the book separately!)


If you are planning on doing a themed unit for Room on the Broom, there is an excellent video to accompany the tale that can be purchased on Amazon. It really brings the characters to life! It can be purchased on Amazon here:


I hope you enjoy teaching Room on the Broom as much as I do!